
There are many video editing apps available today that offer standard features such as trimming, adding text, and transitional effects. However, few offer the ability to blur the background or specific objects in a video.
This is an extremely handy feature and one of the most requested for video editing. Fortunately, Videoleap has got you covered and makes blurring videos effortless from your fingertips.
{{cta-banner-simple}}
When would I need to blur video and video backgrounds?
There are several instances where you may need to blur video aspects.
1. When the background is busy
Sometimes you can capture an awesome video but there’s so much going on in the background that your subject gets lost. Using an app to blur background elements (or the whole background) can add clarity to your foreground and depth of field. This allows your subject to take center stage, creating a beautiful, professional-looking moving picture.
2. When you spot an unwanted object
You may have accidentally captured something in the foreground or background of your video that you didn’t mean to. (Hey, it happens.) Videoleap can help you hide this in just a couple of taps.
3. For privacy reasons
Another reason you may want to blur video details is if important information is showing, whether this is on a building, legal document, or car registration plate. On the other hand, you may want to blur faces if the stars of your video wish to remain anonymous.
Either way, quickly protect privacy by applying a blur directly to the right spot while keeping the rest of the shot intact.
4. To highlight text
Trying to read text while an image is moving can be difficult, especially if there’s a lot going on in the background. Once you know how to blur parts of a video, you can blur the background of a particular clip that you plan to add text to. The text will then be easier to read during this clip.
{{cta-banner-simple}}
How to blur video backgrounds
Easily blur background elements or the entire scene using Videoleap by following 3 simple steps.
1. Open the Videoleap editor
Download Videoleap from the App Store and sign up for a free 7-day trial if you haven’t already. Tap the plus button at the bottom of the screen to import your video.
2. Find the Defocus effect
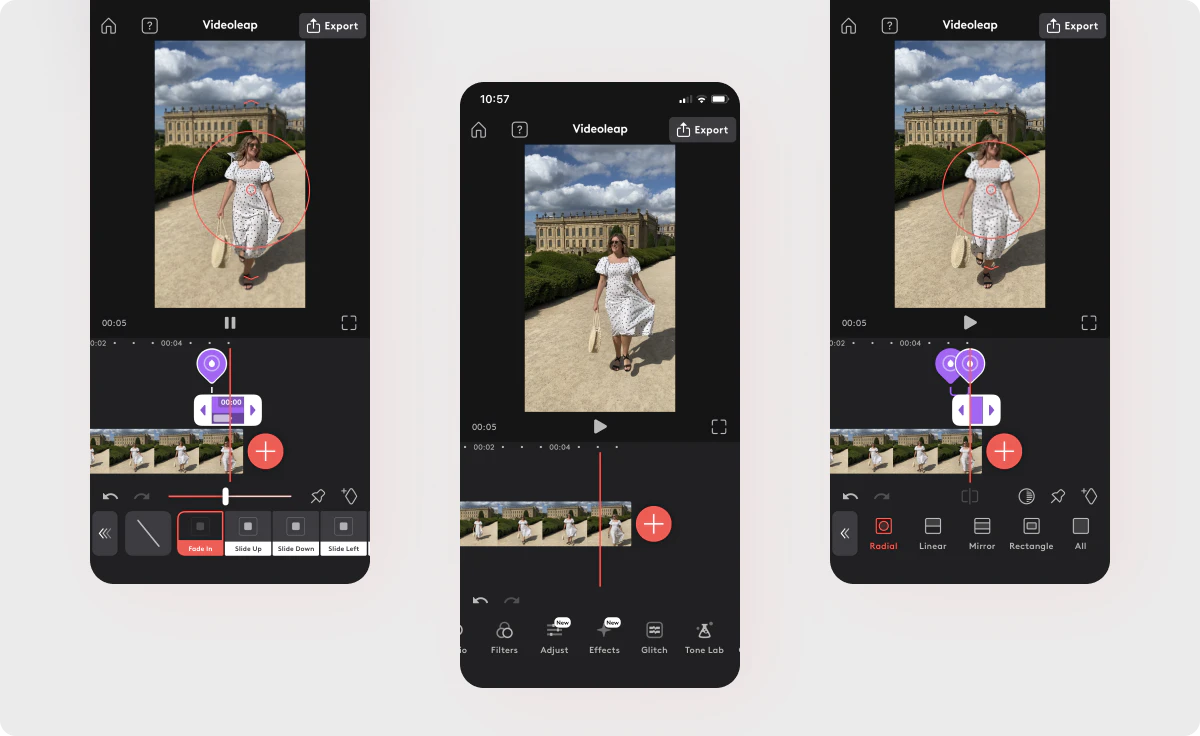
Tap on ‘Effects’ on the bottom menu and then ‘Defocus.’ The blur effect will apply to the current clip you’re editing, and you can drag around the selection until you’re happy with where it sits. You can then tweak your selection in the below ways.
- Shape: Choose from Radial, Linear, Mirror, or Rectangle shapes depending on what would be the most suitable for your chosen clip. You could even blur the whole shot, perhaps for text purposes, by tapping ‘All.’
- Shape Focus: Leave the focus as it is within your selected shape. Alternatively, switch the focus to the outside of your shape by tapping the half-blurred circle button directly above the main toolbar. This can also be used to blur objects, but we’ll discuss other tools with the same function later on!
- Size: Tap and pinch the screen to make your selected blur shape bigger or smaller.
- Intensity: Use the sliding bar to higher or lower the intensity of the effect, making the background blurrier or less blurry according to what’s more visually pleasing.
- Animation: Have the effect just appear as soon as the clip starts playing or adjust how it enters and leaves the frame. For example, you can have it fade in or out, slide up or down, and more.
The possibilities are endless!
3. Export your video
Once you’re happy with your masterpiece, tap the ‘Export’ button in the top right corner. If needed, amend your Export settings in terms of resolution and frames per second. Finally, tap ‘Save’ to upload it to your camera roll.
How to blur moving objects in a video
Trying to blur a certain object in your video? The process is just as straightforward as figuring out how to blur the background of a picture that’s moving, thanks to Videoleap.
1. Select your video to edit
When you first open the app, import your video using the plus button at the bottom of the screen.
2. Find the Pixelate tool
Tap on ‘Glitch’ from the main toolbar and then ‘Pixelate.’ You can make adjustments to achieve your desired result in the following ways.
- Size: Tap and pinch the selection to increase or reduce the size.
- Pattern: Choose between Pixels, Hexagons or Cubes by tapping the ‘Pattern’ button. Adjust the size of the pattern by dragging the sliding bar from left (smaller) to right (bigger).
- Intensity: Tweak how blurry the effect is by dragging the sliding bar from left (less intense) to right (more intense).
- Animation: Pick whether you’d like the effect to transition in or out, or just appear overall as your clip plays. For transitioning in or out, choose between Fade or Flicker.
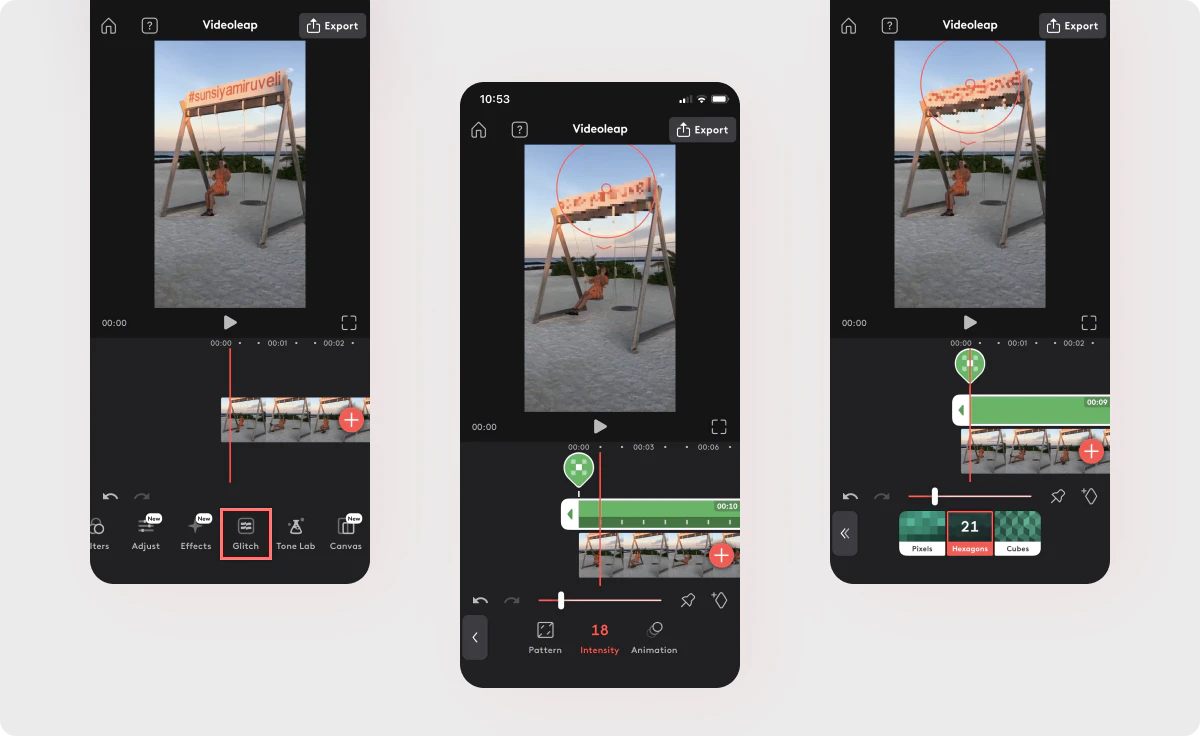
By default, the blur will apply to your entire video. If you want to apply to a designated section, tap the balloon in the editing screen above your film reel. Adjust the green sliding bar representing the effect so that it only covers your desired clip by tapping and dragging the arrows on either end.
You can remove the blur at any time just by holding down this balloon button and dragging it to the trash button that pops up.
Improve your videos in moments
A blur video app that enables you to highlight and fade away aspects of your content without overcomplicating the process is hard to find. Some video editors allow you to blur the background, or blur background aspects. Others let you blur objects. But it’s rare that you can perform all three actions using one tool—and fast.
Videoleap helps you get instant results all in one place, no matter what your skill level. Give it a try today to play, discover, and keep pushing the boundaries of your creativity.


.svg)

.svg)

